How to use ArcPad with SQL - Part 2, UPDATE
A while back we wrote a blog introducing SQL and how you can use it with ArcPad, so here is the follow up article on how go that bit further (anyone else feel like screaming Buzz lightyear's catchphrase?).
For those who are new to ArcPad and/or SQL click on the link above. If you are you too impatient for that then the summary is "Using SQL in ArcPad allows us to select, modify and delete many features in one go quickly and potentially without the use of EDITFORMS (or even when data is not present in ArcPad)". You are now up to speed.
So since the last blog you will have all gone away played with ArcPad and Studio using either your own AXF or the Riverside Sample data and constructed the select queries and all gone "WOW that is amazing! I can't believe how easy and simple it is" and then you would have, now doubt, said "Yeah, it's great I can select lots of stuff, now I want to edit it too. Come on ArcPad Team stop teasing us. We want to know more!"
Updating
In the previous blog we wrote an UPDATE Statement:
UPDATE Poles SET COMMENT = 'The pole requires maintenance' WHERE MATERIAL = 'S'
Breaking it up you can see the command is going to find All of the Poles that have a Material type code of S and UPDATE the Comment field with 'The pole requires maintenance'. If you haven't already, open up ArcPad Studio and play around with the SQL editor to get a good feel for what we are about to do.
Ready, Steady, Scripting
We are now going to UPDATE the zonecode to Multiple Family residential (Zone Code = 4, check the ST_PARCEL_ZONECODE table in the Riverside AXF) for all the Parcels with an APN between 22501002 and 22501007. Now the thing is we haven't talked about how to actually implement this in script, so let's have a look at the ingredients:
- One PC with a functioning keyboard
- One willing participant (well you might not be that willing)
- One copy of ArcPad 7 or above (preferably ArcPad 10, because it's shinier).
- The Riverside sample data (or you can adjust the script to fit your data – I know you'll do this afterwards anyway)
First of all Open up ArcPad Studio and click the Applet icon (or File, New, Applet)

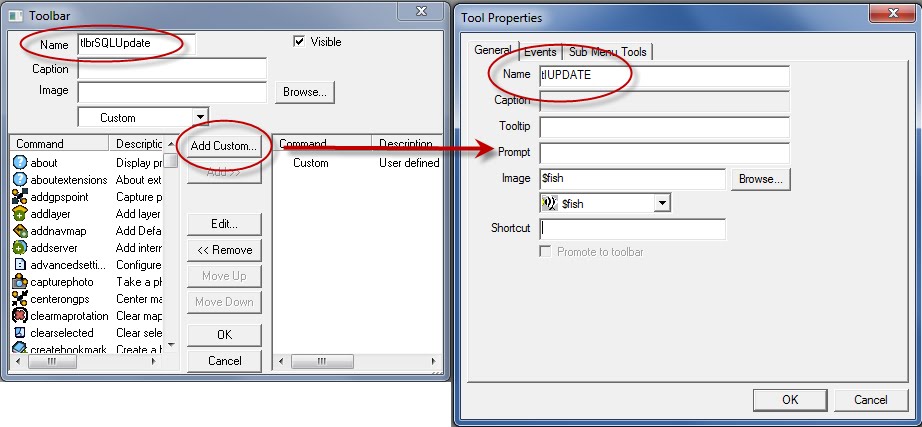
Next we want to create a Toolbar in our new applet. I always give my toolbars and tools a prefixed name so I remember what they are in the script, so I called this toolbar tlbrSQLUpdate. Once you have added a toolbar you add a tool button. Press Add Custom… (and for tools I prefix them with tl). Press OK a couple of times and save your applet. I suggest you save it straight to your default ArcPad Applets folder. Windows 7: C:\Users\Public\Documents\ArcPad\Applets and Windows XP C:\Documents and Settings\All Users\Documents\ArcPad
Now that we have a button that will be used to fire off the script, let's write the script.
This approach of SQL editing can only be done with an AXF (not shapefiles) as we will be using the DATASOURCE object to connect to the data. If your new to this, I will explain it as we go.
Open the script window and we'll start typing. For those that are new to scripting, we are about to write a "routine". A routine is set of steps that are done in a specific order over and over and over again. Our script will:
- Connect to the datasource
- Update the features
- Close the connection to the datasource

First thing we need to do is create a connection to the datasource object of the PARCELS layer so we can crack it open and edit it. Create a variable called myDataSource. I suggest having the ArcPad object model opened nearby and follow the order: Goto the Map object, then go to the Layer object and then have a look at the DataSource object. Oh and having the Help open is good too.
Dim myDataSource 'The Dim creates the object
Set myDataSource = Map.Layers("PARCEL").Datasource 'Here you can see we are going to interact with a layer that is in the Map.
We also need to add a Time Stamp to the Parcel Layer and change the tables AXF_Status column. This will tell ArcMap that something happened to the feature(s) when you check the data back in.
Dim DateTime
DateTime = Cstr(now)
Now here is the best bit, one line of SQL loveliness. The key to this line of SQL is that we are embedding the variable DateTime for the AXF_TIMESTAMP row value so that it dynamically adds the current date and time any time the routine is run. Therefore we have to break the string sentence up into two and splice the variable in the right spot.
myDataSource.Execute("UPDATE [Parcel] SET ZONECODE = 4, AXF_TIMESTAMP = '" & DateTime & "', AXF_STATUS = 2 WHERE APN Between '225201002' and '225201007'")
myDataSource.Close()
MsgBox "Completed! " & DateTime

And we're done scripting! Verify your code and save it. The only thing we have to do is attach the script to our new tool button, so when we click it in ArcPad it will run the SQL command.
Go to the Applet and open the toolbar and open the custom tool's properties.
Click on the Events tab and select the OnClick event, in the event Script panel type Call SQLupdater, then press OK.

One last thing give the toolbar an icon – I going to use the Calculator. Press OK and save the applet.
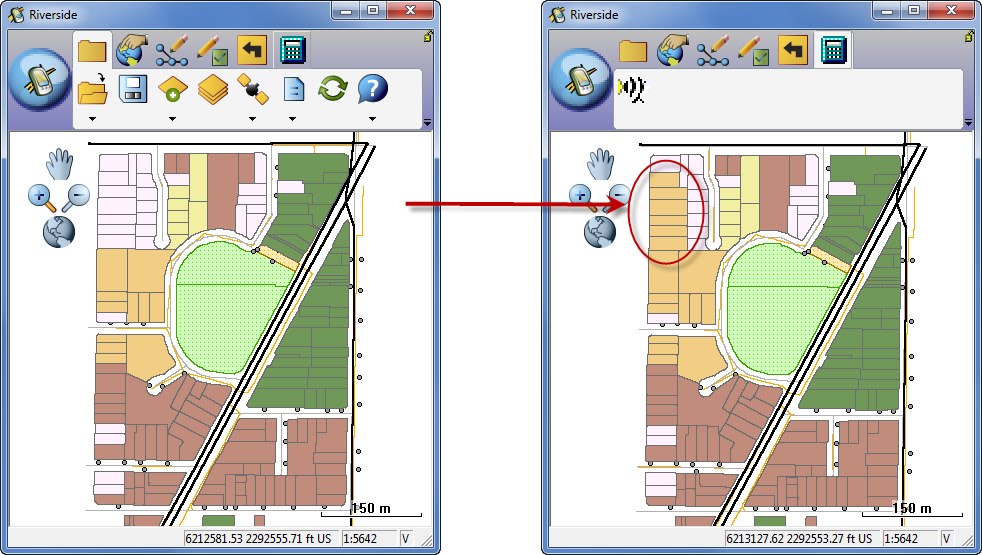
You are ready to test your applet in ArcPad. Once you run your new tool, refresh the map screen and see how the parcels have been updated.
Now that you have seen how to interact with SQL and update many features at once, I have a homework question for YOU. Using SQL in script how can you change the Message box to show the COUNT of features that were updated?
Please put your solution on this ArcPad Forum thread so that other people can learn from each other when they try it in the future.
posted by Gareth Walters @ 16:55
![]()
![]()


 News Feed (Atom)

<< Home