Create ArcPad Templates

In ArcPad 10 the QuickProject wizard was enhanced to support starting the GPS and turning the GPS tracklog on so your device is ready to collect data once you press OK.
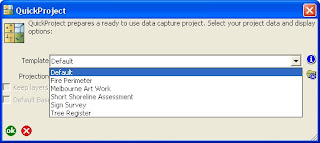
Another enhancement to the QuickProject element has been the introduction of Templates. With this template you can set up your own projects and use this interface to select different projects to use.
Here you can see a screen dump of how it looks out of the box.
So what actually happens? A zip file that contains the pertinent shapefiles, AXF or images and APM is extracted to your default data path – generally your My Documents path and a QuickProject is created with all of the file in it. So, for want of a better explanantion, it takes a replication of the the files and you start from that point. The benefits are many, but a couple are:
- that you can produce a template with either data that has no data in it (a completely blank template) or you could provide specific data in them, perhaps you have a council and you only want staff to work with data in a specific region. Create a template for each of the North, East, South and Western Regions or break it up by suburbs – It’s your choice!
- Also, unlike a default QuickProject you are not limited to 1 point, 1 line and 1 polygon file. You can have as few (1) or as many layers as you want.
- Templates are not limited to shapefiles
- Less options needed in QuickProject
- You can make a template from virtually any existing project
- Easy to distribute. Single file per template that you put into a folder.
By using zip folders we are confident that virtually all of our friends of ArcPad would have used them in some way before and the great thing is that this is using technology that is standard on desktops (we’re only a right mouse click away).
To create the template is as easy as:
- Create a working folder for the template you want to create
- Make a project in this folder that contains all the layers that you want your template to have.
- Customize the layers as you want them to appear. Forms, scripts etc.
- Open the layers in ArcPad, save as a new map in the working folder and name the project Template.apm (it is important to name the map Template)
- You can go to the Map Properties and change the Title from the Template.Apm to something more meaningful based on what your project.
- Create a ZIP file and drag into it the contents of your working folder
- Copy the ZIP file to the Templates folder under the ArcPad installation folder (by default for the desktop: C:\Documents and Settings\All Users\Documents\ArcPad\Templates and on mobile: You are ready to go.
- Run QuickProject and you will see your template listed.
An advanced approach (well not really)
Let’s say you want your template to only have the editatble data in it and you just want to reference some background layers each time the template is used. Well, you have a Working folder so create a BaseMap folder and move all the layers you want in to that. When you create your APM add the layers from the two different locations and then all the data references are set. Then continue on with the steps from 4-6. The only thing is that if you are working on a mobile device make sure you copy the BaseMap folder over as well as your template.
Sharing is Caring
Now once you have created your template projects and implemented them across your organisation, why not share with your ArcPad friends at the ArcPad Code Gallery and submit your entry. Remember just tag it with words like ArcPad, QuickProject, Template and anything else you like.

