The ArcPad Team Blog

Unofficial stuff from the team behind the World's leading mobile GIS platform

Thursday, August 08, 2013

ArcPad 10.2 Released!

Tuesday, July 23, 2013

ArcPad User Group Meeting at the 2013 UC

Thursday, June 20, 2013

ArcPad @ UC 2013


esri uc 2012
Wow - its June already and time for another User Conference! As you know, we've been heads down busting to get ArcPad 10.2 ready and at the same time, working with our colleagues in Redlands to take the best of ArcPad to other applications and platforms.

Come and say hello to the ArcPad Team, and learn something new at the Esri UC in San Diego. This year we have just one technical workshop - An Introduction to ArcPad but we have lots of demo theartre sessions, and of course the ArcPad User Group. Last years User Group was such a hit, were going with a similar style this year.

Tuesday, July 9
(Start Time End Time Session Title Room)
8:30AM-9:00AM ArcGIS for Mobile Overview (07 A/B)
9:00AM-10:00AM Whats New in ArcPad 10.2 (Demo Theater - Apps)
2:00PM-3:00PM Introduction to ArcPad (Demo Theater - Apps)
3:00PM-4:00PM Preparing and Deploying Data to ArcPad (Demo Theater - Apps)
4:00PM-5:00PM Using ArcPad in the Field (Demo Theater - Apps)
5:00PM-6:00PM Customizing ArcPad without Code (Demo Theater - Apps)
Wednesday, July 10
(Start Time End Time Session Title Room)
8:30AM-10:00AM ArcPad - An Introduction (17B)
10:30AM-11:30AM Customizing ArcPad with JScript, Python and VBScript (Demo Theater - Apps)
12:00PM-1:00PM Mobile Special Interest Group (04)
2:00PM-3:00PM Troubleshooting issues with Mobile Devices (Demo Theater - Apps)
5:30PM-7:00PM ArcPad User Group Meeting (26B)

Monday, April 08, 2013

Leveraging ArcPad with ArcGIS Online


Make sure you all head on over to the ArcGIS Videos site to check out our new video -


'Leveraging ArcPad with ArcGIS Online'.

If you are already using ArcPad and ArcGIS Online (or are looking at integrating ArcGIS Online into your organization), this video will give you some ideas on how these products work together to support your field work workflows.

ArcPad Packages (available since December 2012) are the key to this relationship. The ability to dstribute ArcPad Templates and Packages using ArcGIS Online could improve data transfer between remote locations, provide reliable back-up and storage for your projects or even remove the need for tethered data transfer altogether!

So what are you waiting for? Get watching!

 Let us know what you think in the comments!

 - The ArcPad Team

Monday, March 25, 2013

ArcPad 10.2 Beta now available

Esri Beta Community

The ArcPad 10.2 Beta is now available!

To get involved, visit the Esri Beta Community and look for ArcPad on the list of Current Beta Opportunities.

Features in the ArcPad 10.2 Beta include:
  • Data synchronisation with Feature Services
  • ArcPad Project and Template Package support
  • ArcGIS Online integration for file organisation
  • QuickFields for configuring the auto-population of attribute fields
Please remember to submit feedback (bugs, suggestions, and forums posts) on your experience.

Thank you and we look forward to your feedback.

The ArcPad Beta Team

Thursday, January 10, 2013

ArcPad & Windows 8 - A beautiful marriage


Hi everyone,

We have had several questions about ArcPad being compatible with Windows 8 Pro and the answer is YES (it just isn't documented in the system requirements yet).  One recent test was to install Windows 8 onto a rugged tablet and thought we should show you the results.

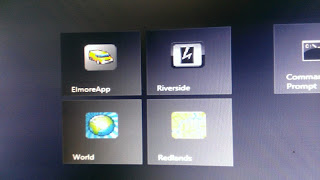
By now many of you have probably heard that the new start screen in Windows 8 is a little different and a bit confusing.  The great thing about all of those icons is if you don’t like them then remove them. You don't have to uninstall anything (unless you want to) but why look at it if you don't have too?

You really only have to think of it as a full screen toolbar that you have pinned items on. In actual fact ArcPad and the Shortcut Apps really benefit from this new full screen look, as the shortcuts apps that were introduced in ArcPad 10 are no longer in a pokey little folder but are smack bang in the middle of your screen with a nice big button.


Above you will notice the standard marketing screenshot of Windows 8, and a business focused version showing only my ArcPad projects. Notice that I don't even have a link to ArcPad on the screen because I want the field crew to only access predefined maps and tools through the shortcut apps.  You may also notice that there is no icon to get to the desktop, which could reduce headaches of switching to and from the start screen.

Here is a screenshot of the shortcut apps.


Now here is a quick view of ArcPad running on Windows 8. What you may notice is that I have turned on the auto-hide function of the toolbar so ArcPad runs in full screen. Once again there are less options for someone to press. Remember "If you don't need it why display it?"


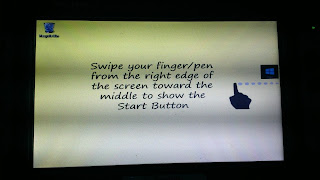
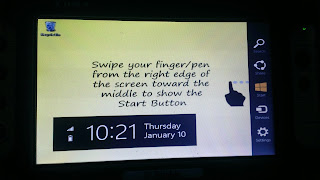
When you exit from ArcPad, as always, you enter back to the classic Desktop, but since Windows 8 doesn't come with a Start button visible on the screen, I have provided some instruction on my desktop background to get back to the start menu.


I think you will see that this is actually a very nice option for field work. A full blown operating system with lots of grunt with an "easy to get started" menu that feels like a tablet (after all that's what a Yuma is).  For many years we have been waiting for Windows to be much more touch friendly and now with Windows 8 it looks like the professional GIS mapping world may just have an excellent candidate.

UPDATE!

Rather than having the lovely instructions on the screen you can actually write one line of code to quit ArcPad and send you straight back to the Start screen. Here are the steps:

  • Open ArcPad Studio
  • Open your ArcPad.apx file - This is a configuration file (Lives in My ArcPad by default)
  • Click the System Objects Button
  • Choose Application and the OnShutDown Event
  • Choose your line of script and copy into the script win
    • VB: CreateObject("WScript.Shell").SendKeys "^{ESC}"
    • JScript: new ActiveXObject("WScript.Shell").SendKeys("^{ESC}");
  • Press Ok, save the file and exit Studio


The next time you open ArcPad this will load and be ready for when you close ArcPad.

Thursday, December 27, 2012

ArcPad Packages


ArcGIS online now has an ArcPad Package type for use by organizations. You can load two different types of package: Templates and Projects.

Upload and download projects (ie, a zip folder containing an apm and any of the following: shapefiles, axf's, rasters) to and from ArcGIS Online instead of your local file system to better serve your remote team members.

Upload your current templates and use ArcGIS Online as your content management system for distribution to field workers. For more information on templates, refer to the help at http://help.arcgis.com/en/arcpad/10.0/help/index.html#/What_are_Quick_Project_Templates/00s1000000w3000000/


Footnote: We also have a similar post over at blogs.esri.com,http://blogs.esri.com/esri/arcgis/2012/12/20/arcpad-packages/
we will continue blogging on both sites for a little while, but I urge you to subscribe to
http://blogs.esri.com/esri/arcgis/category/mobile/ for future news.

Tuesday, December 11, 2012

ArcPad LaserGIS Challenge


I am GIS. I use ArcPad!

What a great line. For those that haven't seen the competition,  LaserTech are running the ArcPad LaserGIS Challenge to allow customers to try their Laser Range Finder (LTI TruPulse, ArcPad extension and training tools completely risk free.

Why not see how you can increase your data collection efficiency. Good luck and Happy Mapping! 

Monday, November 19, 2012

GeoDrive - A new ArcPad Extension


Hi everyone, 


Just a quick note to let you know that RIA Mobile have released GeoDrive for ArcPad, enabling the capture of map features in ArcPad whilst reviewing GPS enabled video imagery.

If you would like an evaluation version, please contact them and they will send you a trial license number and download details of the application and sample imagery.

They  will be holding a series of Web Training Sessions, see training catalog for details on how to register.

Happy Mapping!

RIA Mobile GIS
53 Salamanca Place (GPO Box 2014) Hobart 7000
t +61 3 6223 4919
f +61 3 6223 4381

Wednesday, November 14, 2012

Package ArcPad Template


Hi everyone,

Here is a little present for GIS Day! There is a new "Package ArcPad Template" tool available on the ArcPad Resources page.

This applet automatically creates an ArcPad QuickProject Templates for you within ArcPad rather than following the manual steps shown here ArcPad Online Help
A Template is simply a zip file containing all the layers that make up the template, and an apm file called Template.apm that references all of these layer files. You can easily create your own template from any layers. The layers can be shapefiles, AXF layers or raster layers.
The only manual step to do is to move the newly created zip file to the templates folder.

As always fee free to edit the script to suit your needs.

CLICK HERE for the download.

Friday, October 26, 2012

Using the ArcPad ECW Extension on Windows 7


ECW (Enhanced Compression Wavelet) is a proprietary wavelet compression image format optimized for aerial and satellite imagery. The lossy compression format efficiently compresses very large images with fine alternating contrast.

Support for ECW files in ArcPad has been available as of ArcPad 6 with the addition of a the ECW Extension for ArcPad.

The ECW Extension for ArcPad is available (at no cost) from Intergraph/Erdas at the following website:


This version of the ECW Extension for ArcPad will work with all subsequent versions of ArcPad.

HOWEVER: Some users have been running into issues when attempting to use this extension on versions of Windows other than XP (which is what is was originally developed against).

The following instructions will allow you to install the extension on a Windows 7 PC:

  1.    Type ‘compat’ into the Start Menu search and select ‘Run Programs made for previous versions of Windows’
  2.    Click ‘Next’ on the Program Compatability wizard
  3.    Select ‘ArcPad’ from the list of programs and then click ‘Next’
  4.    Select ‘Troubleshoot Program’ as your troubleshooting option
  5.    Check the ‘I don’t see my problem listed’ option and then click ‘Next’
  6.    Select ‘I don’t know’ from the list of Windows versions and then click ‘Next’
  7.    Check the ‘I don’t see my problem listed’ option and then click ‘Next’
  8.    Click ‘Start the Program’ to launch ArcPad (enter license code if prompted)
  9.    DO NOT CLOSE THE PROGRAM COMPATABILITY WIZARD YET!
  10.    Run the ArcPad_6.0_ECW_Plugin_v1.2.exe
  11.    Check that the install is successful by loading a .ecw file into ArcPad
  12.    Click ‘Next’ on the Program Compatability wizard
  13.    Select ‘Yes, save these settings for this program’ to finish

Now you should be able to use the ECW Extension for ArcPad on a Windows 7 PC!

Enjoy!


Monday, September 03, 2012

User Requested Sample - Incrementing ID's


Hi Everyone,

We had a request at this year’s User Conference to show how build a simple incremental counter. The scenario was that there are multiple people collecting data but each collector has been given a starting range e.g. Fred: 20000 and Barney: 50000.

This range could change from day to day so the ability to change the number was also important. Using ArcPad’s input box, each user can open the map and type in their starting value and then two, one line, scripts will keep it up to date.

This sample has been written into the Edit Form (APL) rather than an applet. The reason for this is that the script is data centric and no matter what map you open with this data in, the scripts will run. Remember applets are predominantly used when you want to achieve consistent behavior whenever any map is used.

You will see three scripts in the jScript file (Poles.js):
  • initiateID() – When the map opens (with the points layer in it), the input box appears for you to type in the starting ID.
  • getID() – When the Edit Form is opened, the text box “NAME” is populated with the current ID
  • updateID() – When you press OK on the form the ID has 1 added to it.

Download the sample from the ArcPad Resources Center.

Thursday, August 16, 2012

GeoDesign on the GO. From ad hoc data to the GeoDatabase


Now everyone has had time to digest all of the information from the Esri User Conference, it is time to start filling you up again.  While presenting and meeting users we realized that we could run for a week just talking about all things ArcPad. One item that seems to be a sleeping giant is QuickProject Templates, especially the DEFAULT template.

One of the key features of ArcPad is that you have the ability to create ad hoc data while in the field, but with the default QuickProject you can also customize the data to better relate to your collection requirements. We are going to run through an example where we have a Side Entry Pit (SEP) inspection to evaluate how much cleaning is required before the winter season kicks in.

Here are the steps we are going to take:
Create a QuickProject
Edit the QuickCapture tab in the Table of Contents.
Edit the Symbology Categories in Layer Properties
Some Rapid Data Capture Techniques
Bring Data into a Geodatabase

Creating a QuickProject is super easy, well in fact every step in this article is. When ArcPad opens, by default, you are prompted with four options and the second is Create a QuickProject. In the “Template” drop down menu have a look to see the different templates available but select the leave Default selected. You will also see that the projection for the QuickProject is listed. If this is not the projection you require for your project, you can press the blue map icon and select a different one.


When you press OK, three shapefiles are made for you – point, line and polygon and they are stored in “My Documents” in a folder named QuickProject_TimeStamp. There is everything you need to get started, even an ArcPad map document (.apm). As you are a starting a blank project, there is obviously nothing contextual in the map, so you can add your own reference data now or simply add an ArcGIS Online Base Map (this requires internet capabilty).


Lets get started

You will notice the QuickProject opens automatically to the QuickCapture toolbar so you can just start editing. There are three symbols per feature class shown and this can be changed dynamically as you work. Because I am creating an inspection project, at this stage, I only see myself needing to work with point data. In the Table of Contents, I am going to activate the QuickCapture tab. The very cool thing about this toolbar is that it represents every symbol category as its own feature class (this is an important note to remember). I have turned off all of the lines and polygons along with adding the two other categories for the points. I don’t know if I’ll need them yet - but let’s turn them for now. It should be noted that label here is purely the Mouse hover tool tip. Feel free to change this if you so desire. I will come back to this.


Now let’s have a look at the point layer and set it up. The symbology tab shows that the data has been created with unique values categories (wow just like ArcMap). You will see the symbols, category (coded value domain) value and label (description). All of these are editable.


First I want to create three values for the SEP inspection:

Symbology (Size) Value Description
Green Dot      (4)            E         Empty
Orange Dot    (6)            H         Half Full
Big Red Star  (8)            F         Full

To apply the symbology, click on the icon and the Symbol properties dialog appears. Go to the Point Style tab and press the “Set to Default Point Style” button to activate the controls. Select the Marker Type, Outline and Fill Color and the Color Designer will appear. Set your size for each and you’re done. Now select the category value and set it accordingly along with the description. As I only need these three categories, I deleted the other two. The delete button is only present when you have selected a category. If I want to add another category later I would come back to this dialog and press the Add button and set up the contents as mentioned.


Once finished press OK, go back to the Quick Capture tab and update the tool tips now that we have a better idea of how we are going to label them. As Windows Mobile does not have tool tips you can make this an optional extra. I am going to make mine simply read:

  • Empty SEP
  • Half Full SEP
  • It’s FULL!!


How do you like that for a focused data capture application in less than 10 minutes? Having a quick look at data capture, we want to start at the QuickCapture toolbar. Moving down a street I can simply click on the appropriate tool and add the feature/inspection. The feature dialog opens and you can see that the Date and Category are already populated. As there is a name field I will use that and populate it, but I don’t want to have to keep typing my name each time. Clicking the Repeat Attributes button (the big arrow on the bottom of the form) will maintain the attributes for the Full category. Remember that important note I told you about earlier, that’s right about each category acting as its own feature class. Well this is one of the powerful reasons for that. Let’s run through another example.


Take Two


While traipsing around the streets I have found that when the SEP is full it is normally with leaves or general rubbish. In the comments I have to keep changing the text from Leaves to Rubbish, so that is not helping my rapid capture of data. Solution: create a new category to provide two QuickCapture buttons. Back to the Symbology tab of the Points layer properties and the category Full Rubbish is created using a big blue star. As a note I also made a change to the original Full label to show it as Full Leaves. The final step is to check the category ON in the QuickCapture tab of the Table of Contents.


Using the new capture category, I need to fill out the name again and press the Repeat Attributes button so that my data is being pre-poulated. In fact, now I have found that I don’t even need the form to collect the data. I wish I could turn it off. Oh wait - I can! Back in the Table of Contents I can turn off the ability to show the form during data capture. All the attributes will still get written, but if I don’t need to see it - why should I? So now all you have to do is click on the QuickCapture button (if you have a gps turned) or additionally click the map to place the feature.


Back at the Office

As you can see within ArcPad there is actually a lot of flexibility to assist in building rapid data collection projects, for some this task could be used as a pilot study to then use to build a Geodatabase.  Well guess what. We can help you there too. In the ArcPad Geoprocessing Toolbox of ArcGIS for Desktop there is a nifty little tool that can convert all that good work with your QuickProject into a Geodatabase aptly called “QuickProject to Geodatabase”.  The tool will not only convert the shapefiles into Geodatabase feature classes, it will create and associate the coded value domains that from the categories you set. 


Note this script was originally written as a Python sample to show what could be done, so feel free to open the python code and edit it to best fit your needs. 

You can load these new feature classes into ArcMap and continue to build upon your fantastic mobile Geodatabase design from ArcPad.


And there you have it. Not only is ArcPad fantastic data collection software but it can also help you build data from scratch to develop enterprise data. Throw in a couple of fantastic, easy to use tools to help increase your data capture techniques and it's fun for all the family (or organisation).

Tuesday, August 14, 2012

Want to see your geotagged video recording route in ArcPad? You can!

Our friends at RIA Mobile GIS have been exploring the wonderful world of HD geotagged video and have now integrated it with ArcPad (and ArcMap and ArcGIS Explorer).
Check out their recent blog that describes GeoDrive an application that allows you to view the video footage, whilst outputting the spatial location of the current frame to ArcPad.
For more information contact RIA Mobile GIS at ContactUs@riamobilegis.com.au.

Monday, August 06, 2012

ArcPad Customization Help is now Online


ArcPad Customization help is now online!


Previously buried in ArcPad Studio along with a lot of information that people didn't use, was a lot of cool stuff that is suitable for anyone customizing ArcPad - not just the hard core developers! So, we have taken it out and made it all a little more accessible. To start with its now online at: http://help.arcgis.com/en/arcpadstudio/10.0/help/index.html

You can also get to this page from

http://resources.arcgis.com/en/communities/arcpad/

In coming releases, the developer help delivered with ArcPad will be organized like this also.

The customization help has been broken into three distinct sections: Concepts, Scripting Reference and XML Reference.

The Concepts section describes how you can customize ArcPad, what are key file types that you need to know about, and how you can use them to change the way ArcPad looks and behaves. The concepts section includes examples on how you can customize forms and toolbars and includes brief scripting samples in VBScript, JScript and Python.

The Scripting Reference section documents the ArcPad Object Model. This reference documents all objects, their methods and properties. This section contains some examples, but this is an area we are actively working on.

The XML Reference section documents the ArcPad XML schema that is used in all ArcPad customization files. Each ArcPad file type is listed with all its valid elements and attributes. Again, some examples are here already but more are coming.

Wednesday, August 01, 2012

Handouts for UC Tech Workshop Attendees

Many people asked for copies of the slides from the tech workshops at the User Conference last week. Handout's are now available on arcgis.com at

http://www.arcgis.com/home/item.html?id=b9509621eb2d452aadb1cc64afef3b09

Information on how to get video recordings of the Technical Workshops can be found at

http://www.esri.com/events/user-conference/agenda/proceedings.html

Tuesday, July 31, 2012

ArcPad User Group meeting at the 2012 UC

Firstly thank you to EDS for your sponsorship of the User Group. The first attendees in the door scored a boxed lunch, and 2 lucky attendees won 1 weeks hire of mobile hardware. Also your presentation on Dollars and Sence - how to productize a custom ArcPad application was excellent - a great message for anyone with a ArcPad project they want to take to the world.For the second part of the session, we tried something a little different :).

After sitting back for a few days of heavy listening, we asked the attendees to tell us a little about how they used ArcPad. We had 55 people at the User Group and below are the group answers to the questions asked. After these questions warmed everyone up, we split the attendees into similar industry groups and encouraged them to meet others and share their experiences and questions with each other. Wow - what a noise! Everyone obviously loved this bit, even when we had to usher people outside so the next session could start, people stuck around chatting outside the doors!

How Long have you been using ArcPad?


In what industry do you use ArcPad?


What mobile hardware do you use?


Does post processing matter to you?


Do you do BOTH office GIS and field GPS work? 


Do you customise ArcPad?


In what Exotic locations have you used ArcPad?
Cold Bay, Alaska
Palmyra Atoll
Atchafalaya Basin, Louisiana
Rattlesnake Hills, Wyoming
Republic of Congo
Kuwait
Islands of coast of British Columbia
Redlands parking lot, Sturt Reserve, Zzyzx Rd (yes, these were a little tounge-in-cheek!)

In what Dangerous locations have you used ArcPad?
wildand fire projects
active taxi ways at Hartsfield Airport, Atlanta
bear survey, Alaska
coal strip mines, Northern Alabama
above 13000 ft in bad weather
collecting water meter info and getting chased off with a fire extinguisher

Of course I had to have a go at mapping these, and yes some were a little easier than others!


View Larger Map


Click 'View Larger Map' to go to the ArcGIS Online webmap and add your own exotic or dangerous ArcPad Project locations.

Tuesday, July 24, 2012

ArcPad Samples from the Esri User Conference 2012

For all of those ArcPad Users attending the Esri UC in San Diego next week, there will be a number of samples used in the Technical Workshops and Demo Theater Presentations that I am sure you will all be keen to try out for yourselves as soon as possible.


The good news for both conference attendees, as well as all of you playing along at home, is that these samples are now available for everyone on ArcGIS.com! Spoiler Alert!


Come for the Sketch Extension and stay for the SQL Update Python Sample! All of the scripts, projects and datasets that will be demonstrated during the conference have been pre-packaged and uploaded just for you!


Find all of the samples HERE!


Let us know what you think in the comments and enjoy the new samples!

Monday, July 16, 2012

ArcPad @ Esri UC 2012


esri uc 2012

Come and say hello to the ArcPad Team, and learn something new at the Esri UC in San Diego. As always there are technical workshops, demo theatre presentations, special interest groups and moderated paper sessions – below are key ArcPad (in bold) and related Mobile GIS sessions.

Tuesday, July 24

(Start Time End Time Session Title Room)

8:30AM-9:45AM ArcGIS for Mobile Devices: An Overview Ball06 E

8:30AM 9:45AM The Water, Web, and Mobile Connection 25 A/B

10:15AM 11:45AM Choosing a Mobile Solution Ball06 E

11:30AM 12:00PM Introduction to ArcPad Demo Theater - Mobile GIS Exhibit Hall B

12:00PM 1:00PM Mobile GIS Special Interest Group Meeting 04

12:30PM 1:00PM Preparing and Deploying Data to ArcPad Demo Theater - Mobile GIS Exhibit Hall B

1:30PM 2:45PM Mobile Disaster Management 17 A

2:00PM 2:30PM Selecting a Mobile Platform Demo Theater - Mobile GIS Exhibit Hall B

3:00PM 3:30PM Preparing Your Data for Field Use Demo Theater - Mobile GIS Exhibit Hall B

5:00PM 5:30PM A Disconnected Dilemma: Using ArcGIS in the Field Demo Theater - Public Safety Showcase Exhibit Hall D

Wednesday, July 25

(Start Time End Time Session Title Room)

10:15AM 11:30AM Road Ahead - ArcGIS for Mobile Devices Ball06 B

10:15AM 11:30AM ArcPad - An Introduction 31 C

12:30PM 1:00PM Using ArcPad in the Field Demo Theater - Mobile GIS Exhibit Hall B

1:30PM 2:45PM USAREUR Sustainable Range Program Omni BallC

3:15PM 4:30PM ArcPad - Customizing ArcPad Solutions 32 A

Thursday, July 26

(Start Time End Time Session Title Room)

8:30AM 9:45AM ArcGIS for Mobile Devices: An Overview Ball06 A

8:30AM 9:45AM Integrating Mobile GIS workflows in Government Agencies 27 B

10:00AM 11:00AM Customizing ArcPad Demo Theater - Mobile GIS Exhibit Hall B

10:15AM 11:30AM Using a Mobile GIS to Manage Assets in the Field 31 B

10:15AM 11:30AM Road Ahead - ArcGIS for Mobile Devices Ball06 B

11:00AM 11:30AM Publishing an ArcPad Project to ArcGIS for Server Demo Theater - Mobile GIS Exhibit Hall B

12:00PM 1:00PM ArcPad User Group Meeting 23 B

1:30PM 1:50PM ArcPad/GeoCollector - A High Accuracy Field Mapping Solution 01 A

1:55PM 2:15PM Developing Geocollector Solutions for ArcGIS 01 A

2:20PM 2:40PM GeoCollector for ArcGIS 01 A

3:15PM 4:30PM Integrating GIS and Mobile Technology into your field Workflow 15 A

Friday, July 27

(Start Time End Time Session Title Room)

9:00AM 10:15AM ArcGIS for Mobile Devices: An Overview 02

Friday, July 13, 2012

Using GPS in ArcPad - The Basics


Using a GPS to collect location information is an integral part of many ArcPad Projects. Although using a GPS receiver sounds easy enough, it is a professional and complicated piece of technology that requires an understanding of your project needs to ensure that the correct quality settings are used.

Let's start out with the basics:

What is GPS and How Does it Work?
GPS stands for Global Positioning System and refers to a space-based system of satellites providing time and location information.


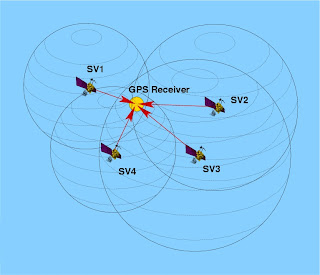
A GPS receiver calculates its position by precisely timing the signals sent by GPS satellites.

Each satellite continually transmits messages that include:

1. The time the message was transmitted

2. Satellite position at time of message transmission

The receiver uses the messages it receives to determine the transit time of each message and computes the distance to each satellite. These distances along with the satellites' locations are used with the possible aid of trilateration, depending on which algorithm is used, to compute the position of the receiver. This position is then displayed, perhaps with a moving map display or latitude and longitude and elevation information may be included. Many GPS units show derived information such as direction and speed, calculated from position changes. Three satellites might seem enough to solve for position since space has three dimensions and a position near the Earth's surface can be assumed. However, even a very small clock error multiplied by the very large speed of light — the speed at which satellite signals propagate — results in a large positional error. Therefore receivers use four or more satellites to solve for both the receiver's location and time.


Recieving GPS Information in ArcPad:
ArcPad supports the following protocols for communicating with GPS recievers:
  • National Marine Electronics Association. (NMEA) 0183
  • Trimble Standard Interface Protocol (TSIP)
  • Delorme® Earthmate®
  • Rockwell PLGR Protocol
  • SiRF®
Any GPS receiver that outputs any of the above protocols should work with ArcPad, as long as the GPS receiver is correctly configured and properly connected to the device being used with ArcPad. This includes GPS connections via Bluetooth or USB as well as all-in-one mobile data collection devices.

ArcPad extension developers can also create their own protocol support, Trimble GPSCorrect is an example of this.

Choosing a GPS Receiver:
Some important questions to ask when looking at incorporating a GPS receiver into your ArcPad project are as follows:

Supported protocols:
Does the GPS receiver output a protocol that is supported by ArcPad?

Accuracy: What accuracy do you require for your GPS positions? Is autonomous GPS with 5–15 meters accuracy sufficient, or do you require differential correction to achieve higher accuracy? Does the GPS receiver have the ability to differentially correct the GPS positions when connected to a differential receiver or using the WAAS differential system? How well does your GPS receiver work under a canopy or in environments that are susceptible to multipath errors?

Differential correction: What type of real-time differential correction is available and reliable in the area where you will be working: beacon, satellite, or WAAS?

GPS receiver functionality: Can the GPS receiver be configured to set such factors as elevation mask, position interval, and SNR mask? Does the GPS receiver have its own display to configure the receiver and use the receiver in a standalone mode?

Cost: How much do you want to spend on a GPS receiver? More accurate GPS receivers cost more than less accurate receivers.

Size and configuration: Do you require a compact GPS receiver or a backpack GPS receiver? Ultra-compact GPS receivers tend to be less expensive but also less accurate than larger GPS receivers. GPS receivers are available in various configurations including Compact Flash receivers, PC Card receivers, Bluetooth receivers, specialized built-in receivers, add-on expansion packs, handheld receivers, integrated receivers and mobile devices, all-in-one antennas and GPS receivers, and backpack GPS receiver systems. Are cables an issue? Bluetooth is a good alternative for wirelessly connecting an external GPS receiver to your mobile device.

Availability and support: What GPS receivers are available in your local area, and is the local GPS vendor’s support adequate?

There is no perfect GPS receiver for use with ArcPad. You should consider all of the above factors when deciding which GPS receiver best meets your field GIS and GPS needs.

Set the GPS Preferences in ArcPad
There is no standard method for connecting a GPS receiver to ArcPad since most GPS receivers have unique configurations. However, by using this blog and the documentation for your GPS receiver and mobile device, it is fairly easy to successfully connect your GPS receiver toArcPad.

Determining what items are needed

In general, bluetooth is used to connect GPS receivers to Windows devices. Compact Flash and SD GPS receivers insert into standard slots on windows devices and built in GPS receivers require no connection. USB GPS receivers usually come with a USB cable permanently attached and connect to standard USB ports on window devices.

In some cases, you will need one or more of the following items to connect your external GPS receiver to the mobile device being used to run ArcPad:
  • A serial cable to connect to the GPS receiver
  • A serial cable to connect to the mobile device
  • A male-to-male gender changer
  • A null modem adapter
You will not need any of the above items if you are connecting your GPS receiver to your mobile device via Bluetooth or USB.

Connecting your GPS receiver
Using the information in the preceding discussion you should now be able to determine which cables, null modem adapters, and gender changers you will need to connect your GPS receiver to the device that is running ArcPad. Obviously, you will not need any cables or adapters if connecting via Bluetooth or when using an integrated GPS receiver, or a USB receiver. Assemble and connect the required items before moving to the next step of configuring your GPS receiver. Also, make sure that the batteries on your GPS receiver are fully charged!

Configuring your GPS receiver

By default, most handheld GPS receivers are configured to not output any GPS data. You need to configure your GPS receiver to output data, generally via the NMEA protocol unless your GPS receiver supports additional protocols such as TSIP. ArcPad supports a minimum of NMEA 0183 version 2.0 standard protocol, so make sure that you select at least version 2.0 of NMEA on your GPS receiver if the receiver supports multiple NMEA versions.

You also need to verify the communication parameters that your GPS receiver is configured for, specifically the baud rate, parity, data bits, and stop bits. You will need this information for the next step of setting the GPS Preferences in ArcPad.

If you are using Bluetooth, you will need to use the Bluetooth Manager on your mobile device to discover the GPS receiver, and possibly to pair your GPS receiver with your mobile device. Consult the documentation for your GPS receiver and mobile device for more information on connecting via Bluetooth.

When you connect your USB GPS receiver for the first time, ensure that you install the drivers for that device which allow NMEA messaging. It is not recommended to install the Microsoft Generic GPS driver for USB GPS receivers. Instead ensure that you go to your GPS manufacturers website and download the most appropriate driver for your device (if it was not supplied with your hardware). Some USB GPS receivers require additional software to translate proprietary formats to NMEA.

One example of this is Garmin's Spanner Software. Spanner creates a virtual serial port which allows you to send data to ArcPad. Refer to Garmin's website for compatible devices.

Before you can activate your GPS, you need to set the GPS communication parameters in ArcPad to match the parameters set on your GPS receiver. The GPS protocol and communication parameters are set in the GPS page of the GPS Preferences dialog box.

GPS Preferences in ArcPad:


Once your GPS is connected, the quickest and easiest way to receive GPS information in ArcPad is by using the 'Find GPS' Tool on the GPS Preferences dialog. When you tap on the binoculars on the GPS Tab, ArcPad will search for your connected GPS device and automatically configure your GPS preferences (If your know the Protocol, Port and Baud of your GPS - you can also configure these settings manually).
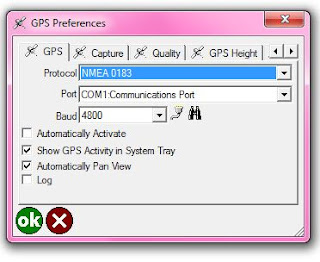


NOTE: If you attempt to enable the GPS from the Main Toolbar in ArcPad without configuring your GPS first - ArcPad will launch the "Find GPS" Tool for you!

Stay tuned for further blog posts delving deeper into the world of using GPS with ArcPad! If there are any particular subjects you would like to see covered, please let us know in the comments.

Friday, July 06, 2012

Customizing the Map Navigator 'On Map' Tools


The Map Navigator is a really useful set of tools for quick and easy navigation around your ArcPad Project and – like everything in ArcPad – it is totally customizable!

The potential is there for you to add extra tools to the Map Navigator, change the 'use once' nature of the current tools and increase the amount of map real-estate on your mobile device by removing all toolbars and placing your project specific tools on the map.

The options for the Map Navigator are stored within the ArcPad.apx configuration file. You can open your ArcPad.apx in ArcPad Studio to edit the XML and create a custom set of tools to put on your map. The options for customization are as follows:


Style – There are 4 styles of Map Navigator:

      Style 0 – Tall Cross
         Style 1 – Wide Cross
Style 2 – Cross
   Style 3 – Vertical

Map Navigator Style 1
 Map Navigator Style 2
 Map Navigator Style 3

Location – The Map Navigator can be aligned to the left or right of the map display by setting the 'horzalignment' element to either 'left' or 'right'.

Tint and Background Colour – These are both RGB inputs for the display of the tools on the Map Navigator. The tint is used to colour the icons for the map navigator and the background colours the background of the icons.

Transparency - The transparency of the backgrounds of the tool icons on the Map Navigator can be set by selecting a value between 0.0 (completely transparent) and 1.0 (completely opaque). 

 Red Icons (tintcolor="255,0,0")

Black Background (backgroundcolor="0,0,0" transparency="1.0") 

Button Size - The default button size for the Map Navigator is 0. If you want the button size to be larger, you can set button size to 2, 3 or 4 etc.

Tools – You can have up to 8 ArcPad Tools on your custom Map Navigator. The easiest place to find a list of the command names for all of the tools in ArcPad is on the Favorites Tab on the Toolbar Settings dialog (where you choose the tools to appear on the Favorites Toolbar). The order of the tools in the ArcPad.apx will determine the order in which the tools are displayed on the Map Navigator.

Flip Icons – In order to make your Map Navigator as aesthetically pleasing as possible when using a cross-style layout, you can flip your icons on their vertical axis by setting the value for the 'flip' attribute to 'true'. 

Use Once – The default Map Navigator has the tools set to ‘use once’ mode so that you can quickly zoom around your map when editing without changing tools. If you want the tools on your Map Navigator to remain selected, you can set the ‘use once’ attribute to false.   

Here is the XML for the default Map Navigator in ArcPad:

And here is some example XML for a customized Map Navigator (as seen at the 2011 ESRI User Conference)


And for those of you who do not want ANY form of Map Navigator Tools in their ArcPad Project, you can hide it by un-checking 'Map Navigator' in the QuickAccess menu.

So go forth and customize you Map Navigator 'On Map' Tools and feel free to share your experiences with the Map Navigator in the comments below.